RadiCentre | Modular Test Systems
The RadiCentre® (Pro) uses a hardware interlock plug (6,3mm ¼” stereo jack) which can be used as a safety interlock. The hardware interlock plug provides two floating contacts which require connection for the system to operate. By default the supplied interlock plug is shorted and must be inserted into the interlock input at the back side of the RadiCentre®. When used with an external interlock system, like a door switch, the wires need to be connected in series with your interlock system and/or emergency stop circuitry. In this case, please cut the RED wire and connect the open ends to your interlock system.
 0
0
 0
0
CTR1004 | CTR1009 | When all mains cables are connected and the mains switches are set to “ON”, simple touch the front screen of the RadiCentre®.
CTR2008A | When using a RadiCentre® CTR2008A press the “on” button on the front of the RadiCentre®
CTR1001S | When using a RadiCentre CTR1001S (single slot). Simply turn on the mains
0
0
The firmware update for the RadiCentre® can be found here: www.raditeq.com/softwareupdate
On this page you can also find the Installation guide to help you perform the update!
1
0
When the RadiCentre® is turned on buy a beeping sound can be heard it means that the Interlock plug has been tripped. This can be intentionally in the case that the interlock is connected to a safety lock on an EMC chamber door or because due to the Interlock plug not being plugged in.
Plug in the Interlock plug to stop the beeing set the RadiCentre® to a state in which the it can be used for testing and measurements.
0
0
RadiField | Electric Field Generators
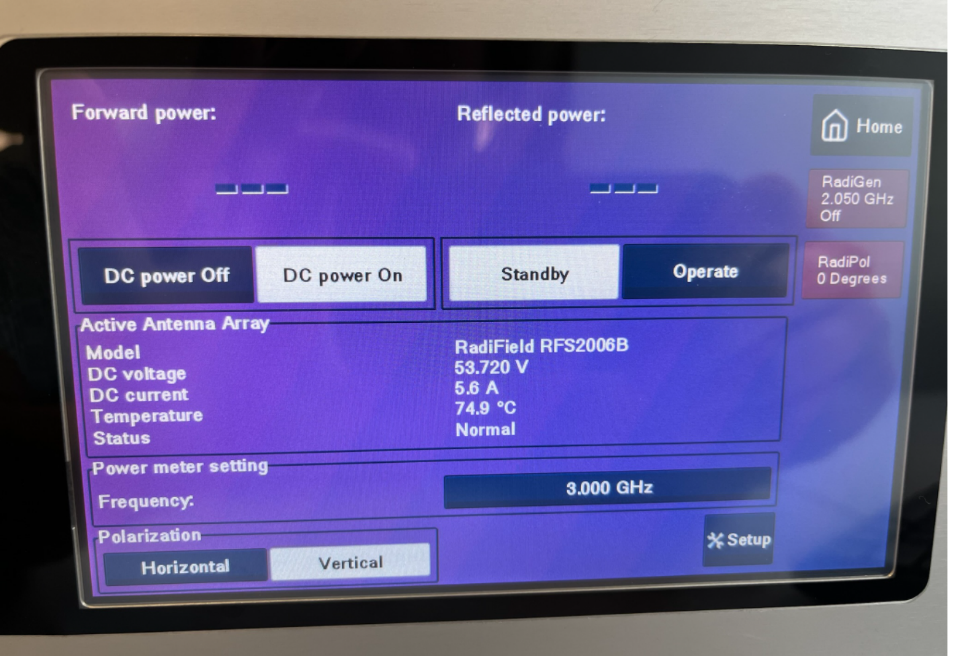
The RadiField is operated through the power supply and communication plug-in card (model PSU2400A). This plug-in card is installed in the RadiCentre (Pro) modular test system and occupies two slots. The PSU2400A has a mains power supply connector, mains ON/OFF switch and one SMA input for applying the RF carrier signal. The N-type output connector has four (4) different functions. First, it transfers the RF carrier signal to the RadiField Triple A unit. Next to this, it provides the 55VDC voltage supply and arranges bi-directional communication to the RadiField Triple A unit. Finally, it can automatically control the horizontal / vertical polarization of the RadiField Triple A unit when it is used in combination with the RadiTower model RTW2000A with integrated polarizer.
0
0
When installing the RadiField for the first time or after any disconnect it might be that the internal polarizer motor of the RadiTower has “forgotten” its settings. Therefore the current polarization need to be redefined. This is done through the RadiCentre screen.
Select under the RadiField Tab on the RadiCentre the polarization setup. Store the current position as Horizontal or Vertical (which ever one is applicable). Then move the mast to the alternate state (so from horizontal to vertical or visa versa). and Store the second position.
Step-by-step guide how to setup the polarizer
1. How do I start the setup for the RadiField polarizer?
Navigate to the Setup option on the RadiField display located within the RadiCentre.

2. How do I set the RadiField to the horizontal position?
Ensure the polarizer’s linear actuator is extended:
- Repeatedly press “Extend (CCW) Course” and “Extend (CCW) Fine” until the RadiField is in the horizontal position.
- Then, press “Store: Horizontal position” to save this position.
3. How can I confirm the RadiField is in the horizontal position?
After pressing “Store: Horizontal position,” the status should update to show that the RadiField is in the horizontal position.
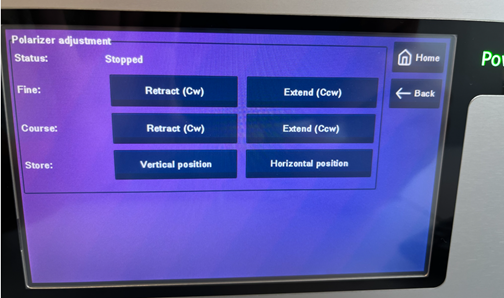
4. How do I set the RadiField to the vertical position?
Press the “Retract (CW)” button repeatedly, turning the RadiField until it reaches a vertical position.
- Once in the vertical position, press “Store: Vertical position” to save it.
5. How can I confirm the RadiField is in the vertical position?
After pressing “Store: Vertical position,” the status should update to indicate the RadiField is in the vertical position.
6. How do I test the polarization switch?
Return to the main RadiField screen. The polarization should indicate “Vertical.” When you press “Horizontal,” the RadiField should rotate to the horizontal position.
 0
0
0
0